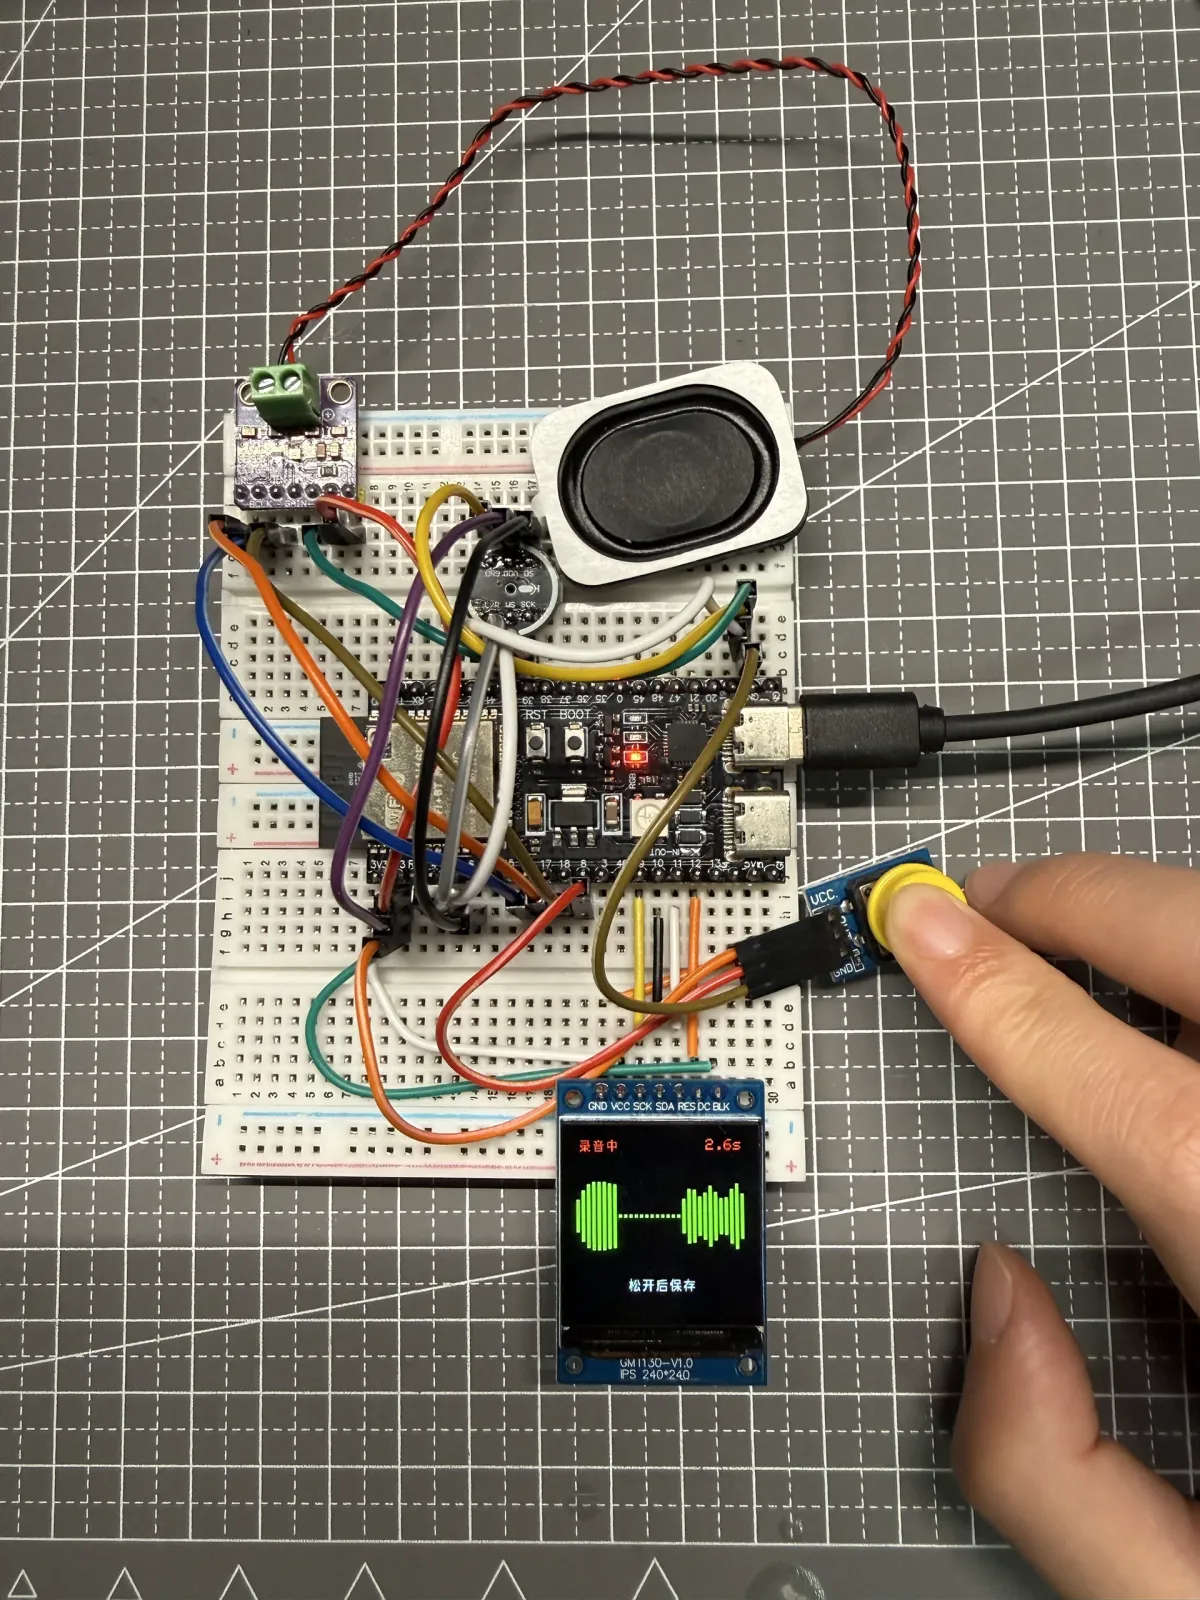
I finally got the voice input feature working.
Now I can hold the button, say a sentence, and release it. The ESP32-S3 packages the recording as a WAV file and uploads it automatically. The server preserves the original recording, creates a processed version for clearer listening, and sends that version to whisper.cpp for transcription. The web page then shows the device status, upload result, and recognized text.
First, the results and applicable scope
| Item | Status in this test |
|---|---|
| Input hardware | ESP32-S3 + INMP441 digital microphone + separate button |
| Capture format | 16 kHz, mono, I²S 32-bit container; exported as PCM16 WAV |
| Maximum recording length | 5 seconds, corresponding to 80,000 sample points |
| Device feedback | Chinese status, recording timer, and 32 green relative volume bars |
| Server-side result | Validate and save the original version and the clarity-processed version, and start speech-to-text in the background |
| Current boundaries | The transcribed text has not yet been handed to an LLM, and no automatic answer loop has been formed |
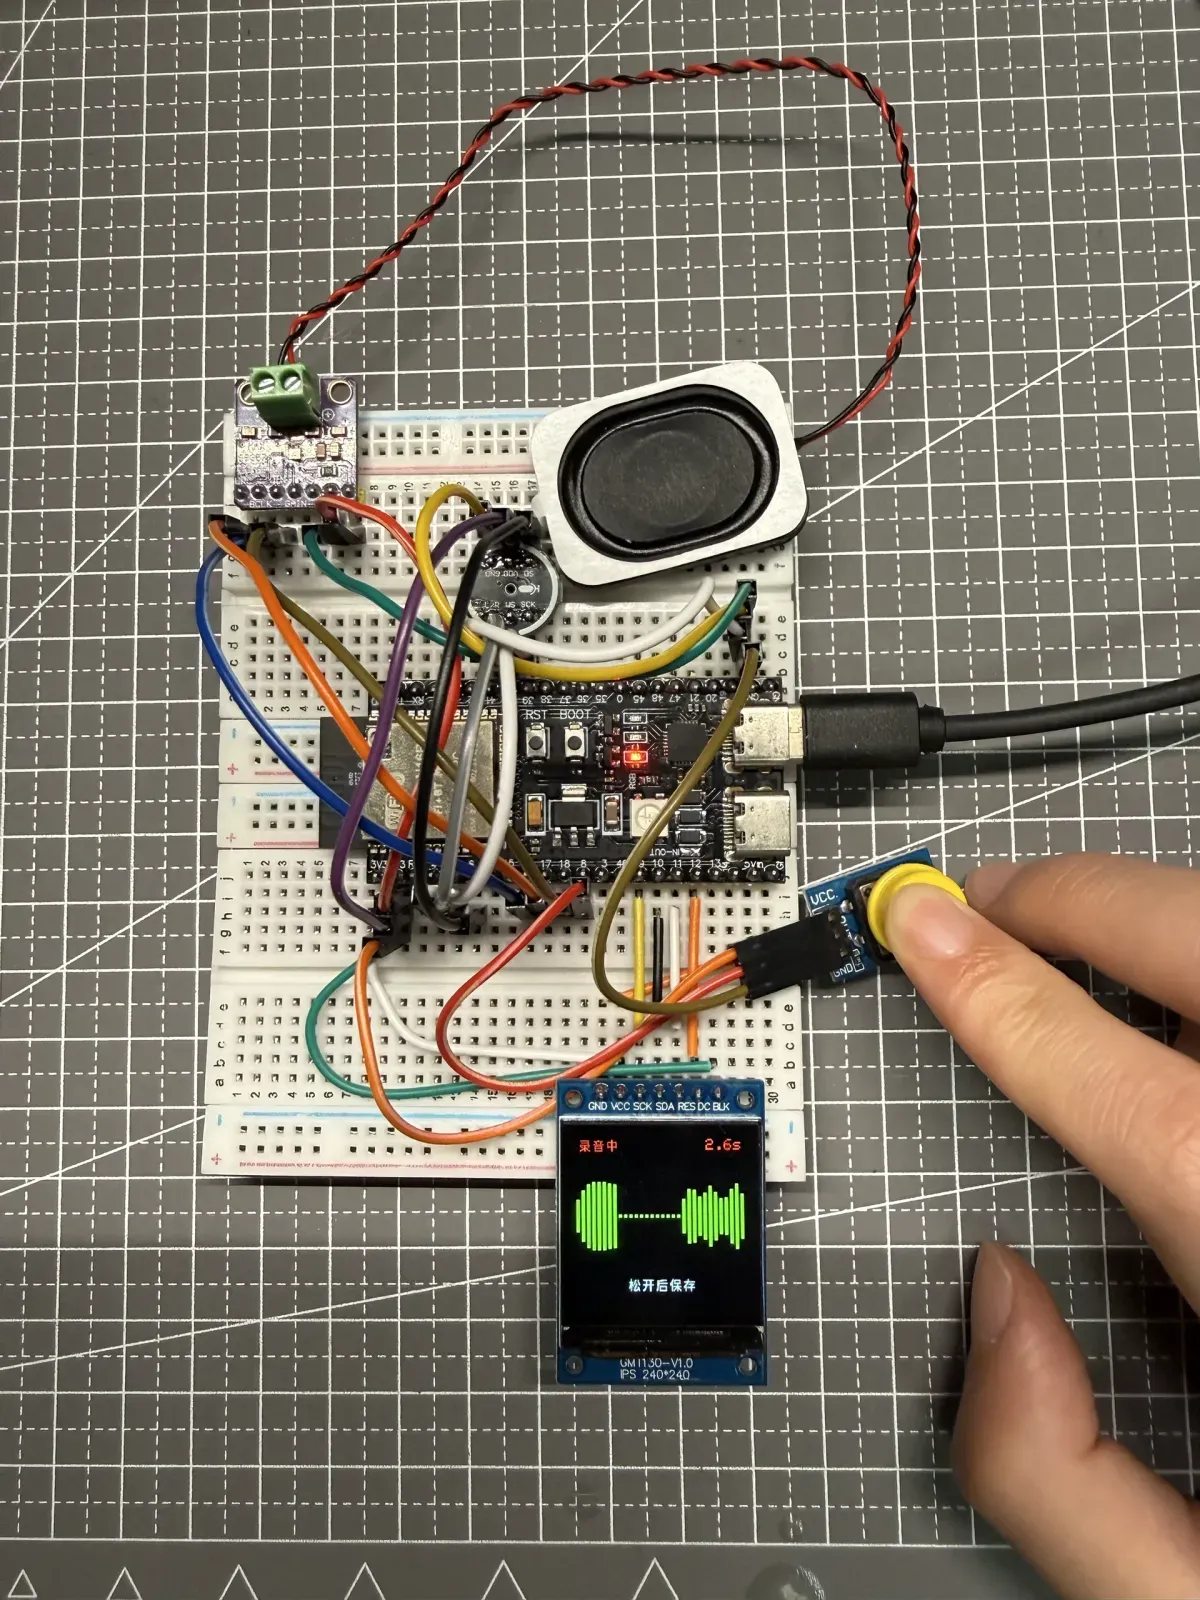
When recording by holding the yellow button, the screen displays “Recording,” a timer, and a green relative volume waveform.
How the entire voice input chain works
This is not as simple as “connect a microphone and call a recognition API.” What really needs to work reliably is a continuous data chain made up of sampling, interaction, files, networking, server-side processing, and web display.
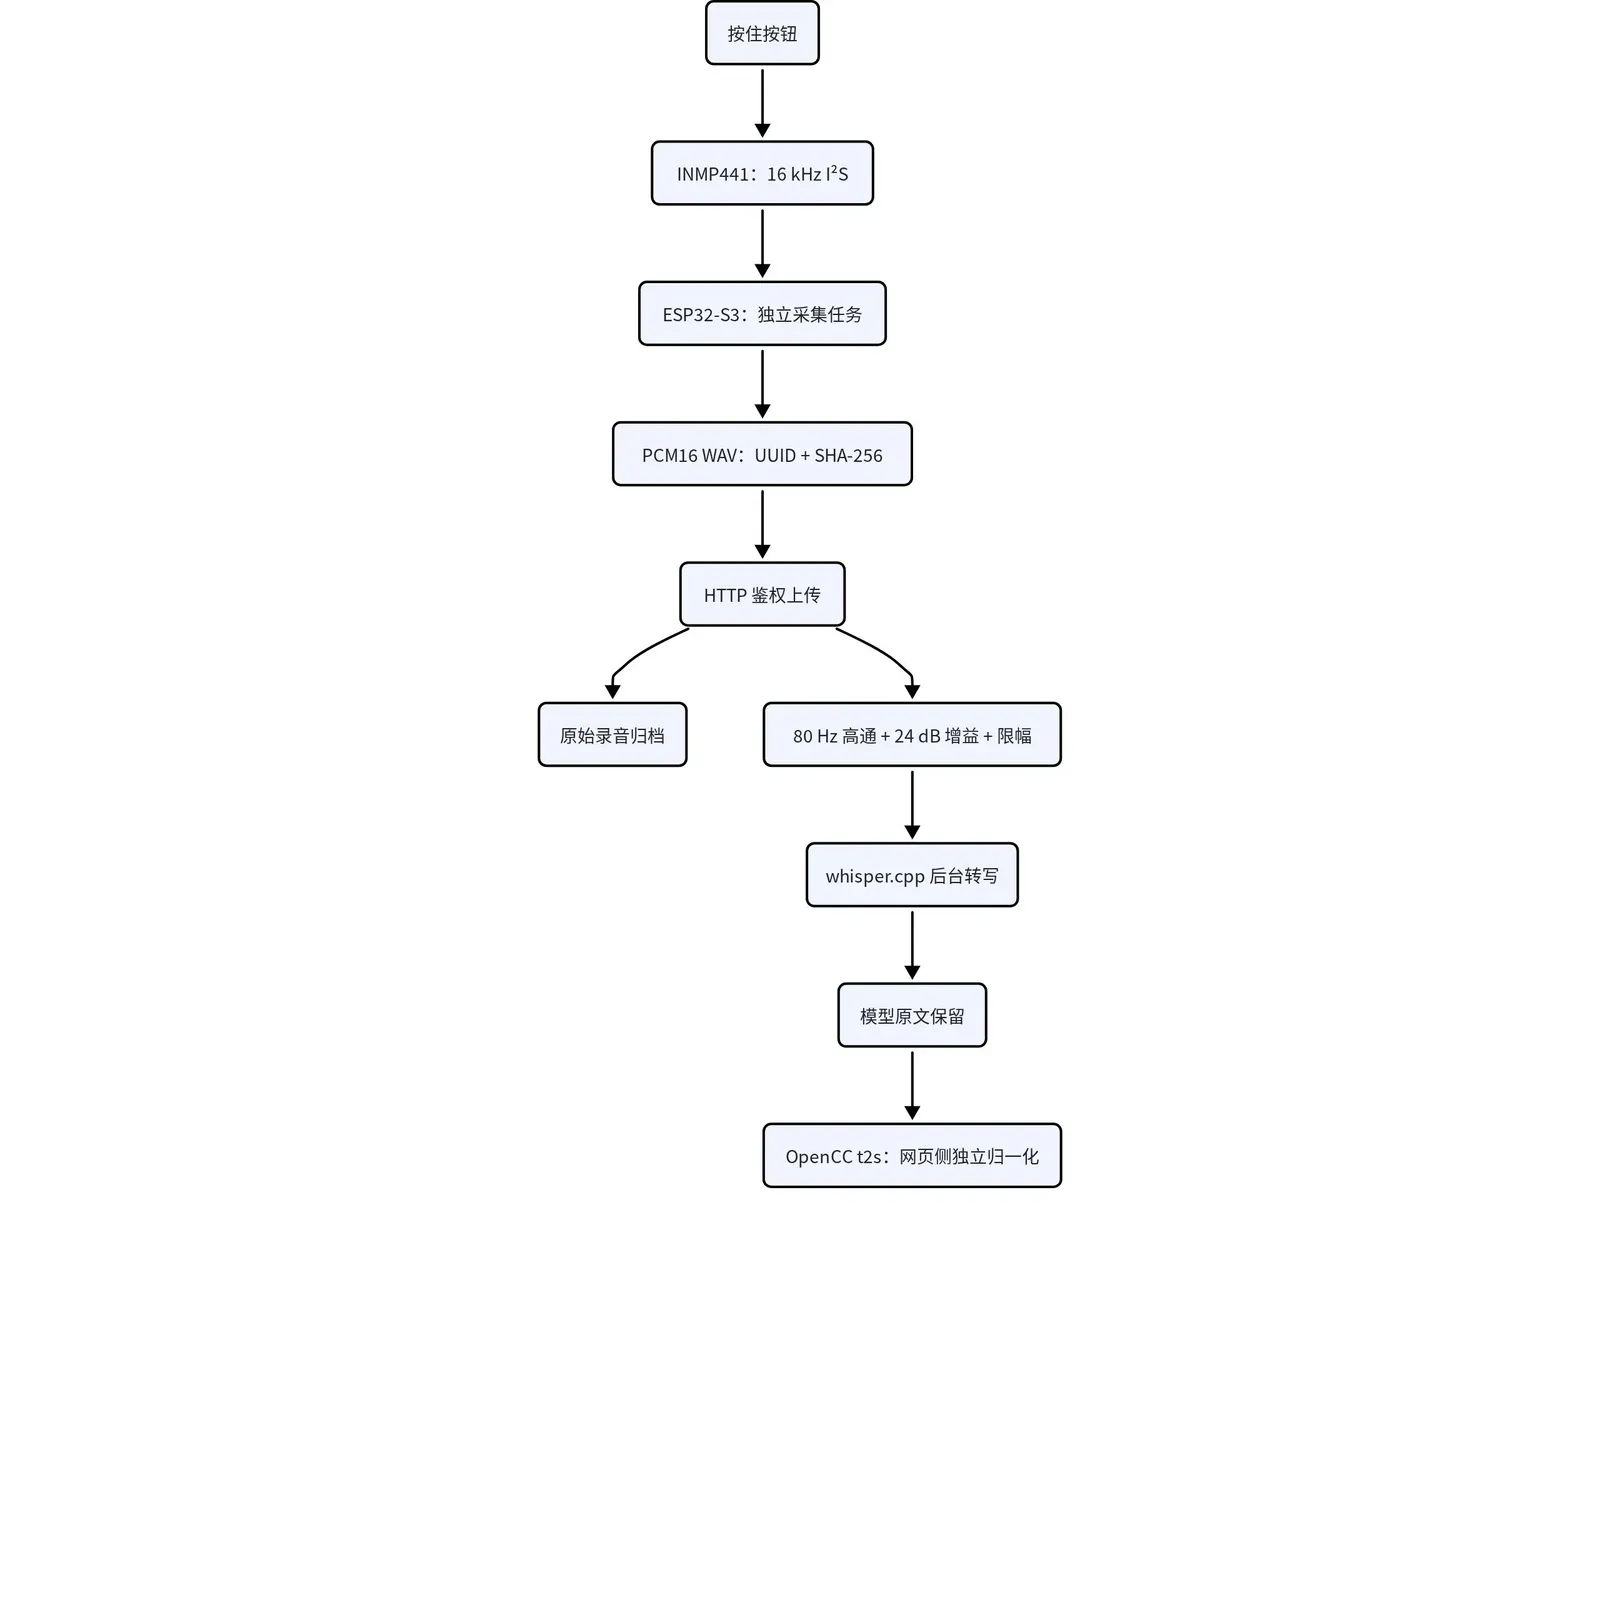
The voice input chain from holding the button, I²S capture, and WAV upload to original recording archiving, clarity-version processing, whisper.cpp transcription, and web Simplified Chinese normalization.
There are two important boundaries here:
-
Raw data is not overwritten. The WAV uploaded by the device is retained as a low-level archive, and the processed version is a derived file generated on the server.
-
Traditional-to-Simplified conversion does not enter the critical path of future conversations. The raw transcript is retained first; when the web page needs it, an independent, retryable OpenCC t2s normalization runs separately. This avoids increasing the device’s response time merely to normalize the displayed text.
Hardware wiring: why the left channel is always read
This wiring uses the following endpoints. The button and screen reuse the wiring already verified in the project, and the table lists only the INMP441.
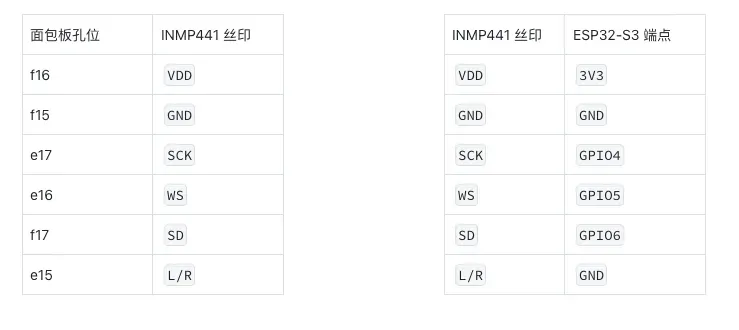
INMP441 breadboard hole positions and ESP32-S3 endpoint mapping used in this test.
| INMP441 | ESP32-S3 | Purpose |
|---|---|---|
| VDD | 3V3 | Power supply |
| GND | GND | Common ground |
| SCK | GPIO4 | I²S bit clock BCLK |
| WS | GPIO5 | Left/right channel word select |
| SD | GPIO6 | Microphone data output |
| L/R | GND | Selects the left-channel slot |
Although the INMP441 has only one microphone element, it still sends data according to the I²S left and right time slots. When L/R is tied low, it outputs in the left-channel slot; when tied high, it outputs in the right-channel slot. Therefore the firmware must match the wiring and explicitly read the left slot. The right channel has not “disappeared”; it is just that a second microphone is not currently configured on the bus for the right slot. This behavior can be verified in the TDK INMP441 datasheet and the Arduino-ESP32 I²S documentation.
microphone.setPins(4, 5, -1, 6);
microphone.begin(
    I2S_MODE_STD,
    16000,
    I2S_DATA_BIT_WIDTH_32BIT,
    I2S_SLOT_MODE_MONO,
    I2S_STD_SLOT_LEFT);
Stabilize sampling first, then do screen animation
Initially, I put I²S reading, button detection, and screen refresh all in the Arduino main loop. The screen uses an ST7789, and in testing it was configured for SPI Mode 3, 1 MHz. During recording, large-area screen clears and redraws occupy the main loop for long periods; as a result, the UI appears to be working, but the number of samples actually recorded is far fewer than the number that should correspond to the elapsed time.
The final approach was to move continuous I²S reading to a FreeRTOS task pinned to core 0. The main loop is only responsible for button state, recording end conditions, heartbeat, and screen scheduling. ESP-IDF’s FreeRTOS SMP documentation explains the core affinity of xTaskCreatePinnedToCore; the purpose of using it here is to make sampling no longer wait for screen drawing to finish.
xTaskCreatePinnedToCore(
    captureTask,
    "voice_input_capture",
    4096,
    nullptr,
    2,
    nullptr,
    0);
The waveform also did not plot the raw amplitude directly; instead, it calculated the centered RMS of a batch of samples, and after noise floor, upper limit, and attack/release smoothing, mapped it to 32 narrow bars. The waveform updates every 40 ms, about 25 FPS; the timer text updates every 200 ms. Each frame erases and redraws only one 4 px-wide bar, rather than repeatedly clearing the entire area.
| Item | Parameter | Purpose |
|---|---|---|
| Waveform refresh | 40 ms | Make changes in loudness continuously visible |
| Timer refresh | 200 ms | Reduce text redraws |
| Loudness bars | 32 bars, 4 px wide | Local updates, with no large-area screen clearing |
| Envelope parameters | attack 0.60 / release 0.15 | Rapid rise when speaking; smooth fall when quiet |
The final combined test recorded 61,184 samples in 3,827 ms. At 16 kHz, the theoretical count is about 61,232, a difference of roughly 0.08%. Direct observation also confirmed that the waveform looked noticeably smoother.
Generate a standard WAV from 32-bit I²S samples
Device memory stores 32-bit I²S containers. During export, the upper 16 bits are taken to generate mono PCM16, and a 44-byte RIFF/WAVE header is added. For the WAV fmt and data chunks, sample rate, channel count, and bit width fields, refer to Microsoft’s RIFF/WAVE documentation.
A maximum 5-second recording requires 80,000 32-bit sample points; both the capture buffer and the WAV buffer are placed in PSRAM. A button press of less than 300 ms cancels, while reaching 5 seconds automatically ends it, avoiding unlimited memory usage.
The first raw recording that could be fully exported was not “no data”: of 67,328 sample points, 99.2499% were non-zero; the problem was that the level was very low, with an RMS of -48.5137 dBFS and a peak of -29.7213 dBFS, making it hard to hear clearly when played directly.
Therefore, the server keeps two files:
-
Raw capture: Preserve the WAV uploaded by the device byte for byte, for archiving, review, and reprocessing.
-
Processed version: Apply an 80 Hz high-pass filter and 24 dB gain, then limit peaks to the safe PCM16 range for listening and speech recognition.
For the corresponding sample, the cleaned version’s RMS is -31.0563 dBFS, about 17.46 dB higher than the original version. It does not replace the original file; it is a traceable derived version.
Upload protocol: verify identity and data first, then start recognition
The ESP32 uses POST /api/v1/device/recordings to upload audio/wav. The request includes a Bearer device token, a standard UUID, the audio SHA-256, a 16 kHz sample rate, and a mono declaration. The firmware tries at most 3 times, with a 15-second timeout per attempt.
http.addHeader("Authorization", String("Bearer ") + VOICE_DEVICE_TOKEN);
http.addHeader("Content-Type", "audio/wav");
http.addHeader("X-Recording-Id", recording_id);
http.addHeader("X-Audio-Sha256", wav_sha256);
http.addHeader("X-Sample-Rate", "16000");
http.addHeader("X-Channels", "1");
The server does not simply trust the request headers. It recomputes the SHA-256, checks the UUID, file size, whether the WAV is uncompressed PCM, whether the sample rate is 16 kHz, whether it is mono, whether the bit depth is 16 bit, and verifies the file header against the actual data length. Only after all checks pass does it save the file with an atomic write, generate the cleaned version, and register it in the database.
When the same content is uploaded again with the same recording ID, the existing record can be safely returned; if the ID is the same but the hash is different, the request is rejected. This means device retries do not create duplicate recordings and do not silently overwrite another piece of data.
Why transcription and Simplified Chinese display are split into two layers
After a successful upload, a FastAPI background task runs the processed recording through a local whisper.cpp instance. The call explicitly selects the multilingual model and Chinese language, disables timestamps, and stores the returned text as the raw transcript. Parameters such as whisper.cpp’s language and initial prompt can be verified in its public header file.
In actual testing, the Chinese model may return Traditional Chinese characters. A prompt alone can improve a particular sample but cannot guarantee strict conversion, so I did not treat prompting as the only solution. When the web page needs consistent Simplified Chinese, it calls OpenCC with t2s.json; the original text, normalized result, version, elapsed time, and failure status are stored separately. OpenCC’s official documentation lists this standard Traditional-to-Simplified configuration.
This conversion layer is designed as an independent, retryable web capability. In the future, when the device needs to answer questions, the raw transcription can go directly into the conversation flow without waiting for OpenCC; the web page can show loading and display Simplified Chinese text after the conversion completes.
Real results on the web page
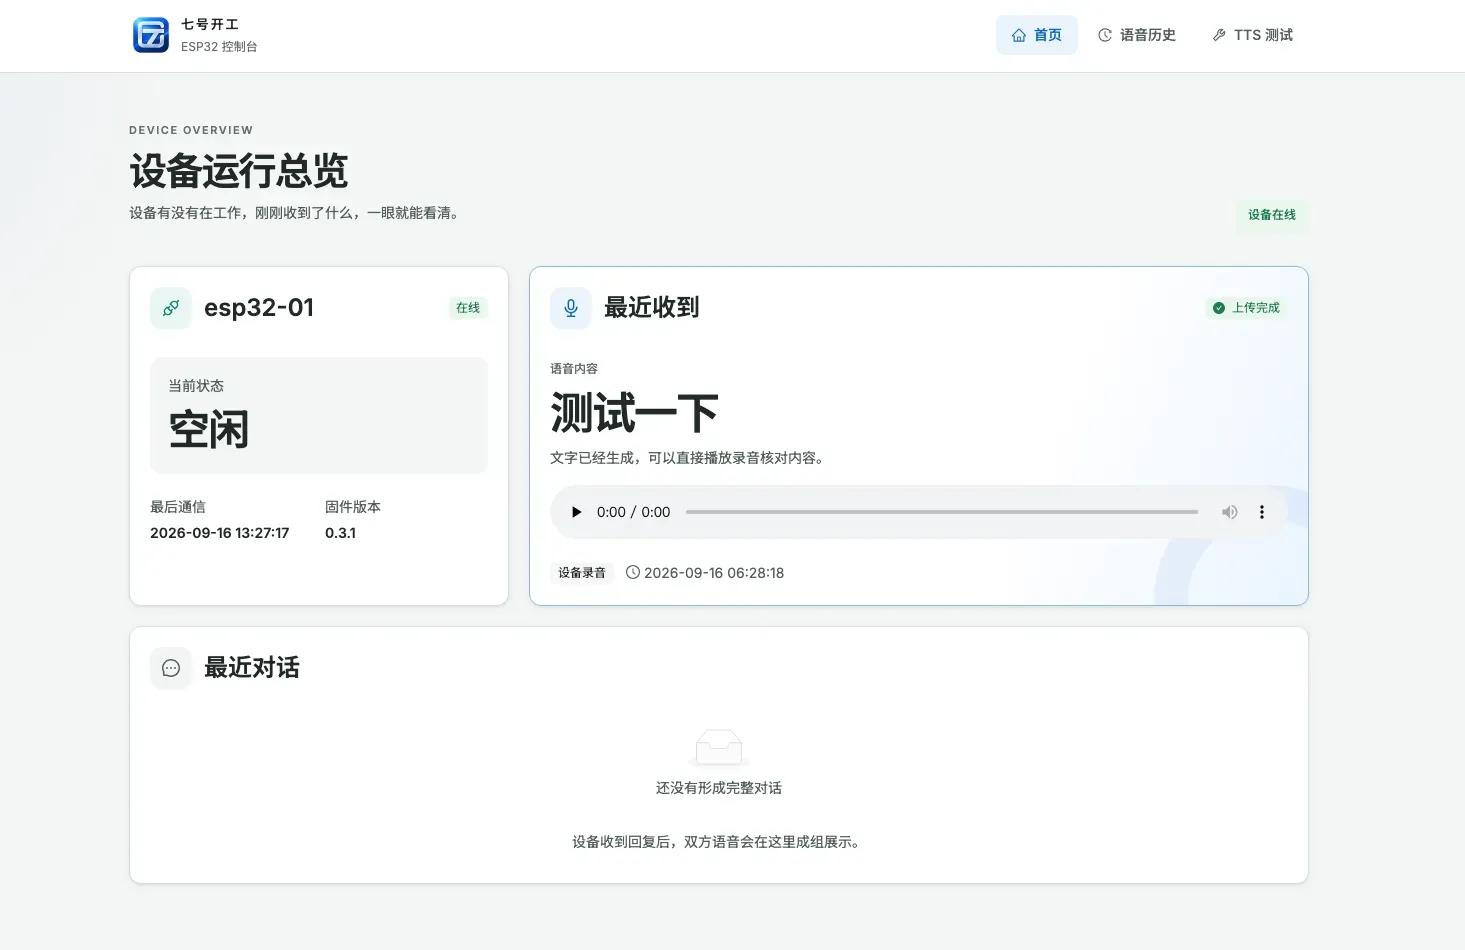
After a real device recording is uploaded, the web page shows the device online, upload complete, and the recognized text “Test it”; a complete conversation has not yet formed.
This screenshot can prove that the device heartbeat has reached the web page, the most recent recording has been uploaded, and text has been generated. The player was displaying 0:00 / 0:00 at the time, so this article does not treat the screenshot as evidence of audio duration or correct playback; audio audibility comes from the earlier independent playback test.
The “Recent Conversations” section below still shows an empty state, which accurately reflects the current boundary: the system can already hear, but it has not yet handed the recognized content to AI or formed a question-and-answer loop.
Public code and reproduction entry points
The public firmware matching the version currently on the ESP32 is located at qh-video-voicebot / 008-voice-input / esp32. The directory contains Arduino source code, auxiliary header files, example key configuration, and a README, but it does not include real passwords, tokens, server-side databases, or local models.
At this point, the voice conversation is about 50% complete
“50%” is my subjective judgment of current project progress, not a precise metric calculated by lines of code. The input side is already connected end to end: the device can capture, display, encapsulate, upload, process, and transcribe speech.
The next step is to hand the recognized text to AI, let it generate a response based on what I say, then turn the response into speech and send it back to the device through the already-connected playback path.
At that point, it will not just be “hearing”; it will be able to truly converse with me.